Showing posts with label wood working. Show all posts

Sunday, November 17, 2013

Bunk Beds


Last year--July-August of 2012 (yes, I am that far behind)--my husband built this set of bunk beds for our kids. We were expecting our fourth child and needed to do some room sharing. This spot was a great spot in the room, but it was just not quite wide enough to put pre-made bunk beds in the space. So he built them in place. Those things are never moving. 


He did some other cool stuff for them. He wired in a light with each bed so they can read at night. He also added shelves at the head of the bed.


Each bed also has a "treasure box." Under the bottom shelf, you can pull down the opening and fit a whole lot of treasures inside. Our kids love it!

Friday, September 28, 2012

Initials


McKenna moved in with Kaitlyn, so I needed to take the old K and P and change them to K and M.

I got the letters at Hobby Lobby. Once again, my husband spray painted them for me. We covered a board with fabric, then put a molding frame around it and attached the letter to the center. Add some ribbon and you are done!

old letters

new letters

Wednesday, September 26, 2012

Name letters


For Brinley's nursery, I got these letters at Hobby Lobby. I painted them pink, then cut a sponge into the shape of a circle and dipped brown circles on the letters.

Sunday, December 4, 2011

Thanksgiving Decorations


I made these cute things at a craft night with On The Avenue. Love that place.  I really like these. I also made some block letters that spell Autumn--but apparently did not take a photo. 

Tuesday, July 19, 2011

Garden Angels


I just ran across this picture. These are some garden angels I made. One for me, one for each mom for Mother's Day. I started to remove the background in Photoshop and it was going to take lots of effort with those wings, so I decided it wasn't worth it.

Wednesday, July 13, 2011

Face-Out Bookshelves Tutorial


I put this up on my learning blog, but I thought it would be a good fit for this blog, too. You can use these for books or pictures--of whatever you come up with!

Here is our tutorial on how to do a face-out bookshelf. This is the way my husband designed so you couldn't see a back on the shelves--it looks like they are free-floating. Hopefully I can translate from Engineer-ese to English.

Materials Needed:
  • 3/4"x1.5" pieces of wood cut to the length you want them on the wall. This is the actual size of the wood. They will be called 1"x2" in the store. You will need two pieces of wood for each shelf. Buy as many as you need to fill the space on your wall.
  • 3" Grabber screws
  • Glue if desired (we used wood glue)
  • Paint and paint brush (we use foam brushes for projects like this)
  • Finish nail gun nails
  • Wood putty
Tools Needed: 
  • Drill
  • Router and/or Table Saw
  • Measuring Tape
  • Pencil
  • Finish Nail Gun
Prepping Wood
1.First, buy your wood. If you are confused on what to buy, see the picture below. Click on it to enlarge. The wood shown in this picture would make one shelf. Cut wood to desired length.


2. Next, you need to router and notch one piece of wood for each shelf. 

Use a router or a dado on a table saw to notch one corner (all the way down the long side) as shown. Again, click on the picture to enlarge.


Use a router the opposite corner if desired. You can do it however you like things done. We used a 45 degree chamfer. You could do things more fancy if you like, or you can do nothing at all.

3. Brush all sawdust off and paint. Allow paint to fully dry. You don't have to paint the 1" (3/4") sides of the un-notched wood. 

Putting Up the Shelves
1. Measure and mark on your wall where you want the shelves. You might want to involve a level.

2. Pre-drill holes in your wall where studs are. It is very important you drill into studs.

3. You can glue one side of the shelf if desired and hold to the wall. We can't remember if we used it at this step or not.

4. Use 3" grabber screws to anchor to the studs. You want the 1" (3/4") side facing out so the long side of the wood is where your book will sit. Countersink screws so that they to just below the surface of the wood. Just make sure you don't go too far and split your wood.


Here are all of our initial pieces on the wall


 5. Uses a finish nail gun to put up the face piece. At this step, we did use glue to secure the two wood pieces together. You want the notched side in and up and the routered side out and down. See the picture below. The notching makes it so the shelf is a bit deeper while providing a lip to keep books on the shelf.

Finishing Touches
1. Use wood putty to fill in holes where finish nail gun put nails in. You want this to just go in the holes and not bump out beyond the hole.
2. Paint over wood putty once it is dry.
3. Put books up!


Monday, April 11, 2011

Wreath Holder


My friend Laura and I were shopping one day and saw something like this, so naturally I asked Nate to make one! It is beadboard with moldings around the outside. I painted it black. I might distress it. It holds a seasonal wreath. I love it!

Friday, October 29, 2010

Wood Shelf


So fabulous. That is a great blog. So I informed my husband of this great tutorial and informed him he would be making it for me :) I painted, he hung.


Here it is with some leaves on it. It is a great shelf for warming up the room. This picture was taken a month ago, so I have more to show you soon :)

Wednesday, May 5, 2010

Wood Block Pictures


This is an art project you can have your child help out with and give to Mom or Grandma. They are blocks that spell out the word "Grandma" (or Mother, Mom, or Grandmother, etc.). I dedicated one block per person and put pictures on it. I did one block for my Mom's Grandmothers. One for her mom. One for my Dad's mom. One for my mom with Brayden. And one for her with Kaitlyn. Since I gave her these, two grandchildren have joined the family, so I will have to update them! 

Now, you can tell from this picture that she doesn't actually show the "Grandma" spelling. She really just likes it for displaying pictures. If your Mom/Grandma would be like that, then you can skip the letter part of the blocks.

SUPPLIES

  • Wood blocks the size of your choice. We bought a 4x4 piece of wood from Home Depot and cut the blocks to our desired length. I am sure you could find something similar in a craft store like Michaels.

  • Decoupage or Mod Podge. You can also get Mod Podge Satin All-In-One Decoupage Sealer. Please note that different Mod Podges have different finishes, from Matte to Lustre.


  • Photos of your choice, cut to the appropriate size for your blocks.

  • Paint

  • Vinyl Letters or you could paint letters on

  • Sandpaper if you want a "distressed" look
METHOD

  1. Paint the blocks using the paint and foam brush. This is something your child can help with. Most of the block is covered by photos, plus if you distress it , you will have little need for a "perfect" paint job. Plus, we love things made by the children we love.

  2. Let dry.

  3. If you want a distressed look, gently sand the each edge of each block. You can decide if you do this part yourself or with help. Wipe all dust off.

  4. Put some decoupage or mod podge on the block.

  5. Put some decoupage or mod podge on the back of a photo.

  6. Place the photo on the block.

  7. Continue for all sides.

  8. Once you have photos all around the block, move on to the other blocks and put photos on those.

  9. Let dry.

  10. Decoupage or mod podge over the top of each photo. This will help protect the photo from scratches, water, etc.
You are done! And you have a lovely gift any mom will love.


Wednesday, February 24, 2010

Wood Flowers

This isn't my creation. It was my Valentine's gift from my kids. Brayden painted the brown, Kaitlyn painted the pink, and "McKenna" painted the red (the Daddy version of McKenna). How sweet!

Monday, May 4, 2009

Shadow Boxes

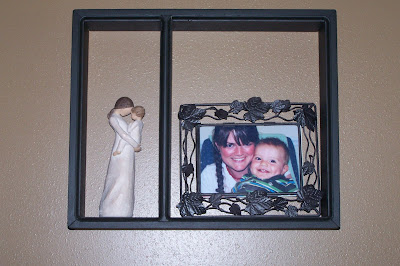
Time to show more of Nate's talent. For Valentine's Day, Nate and I have a rule that you can't spend money on our gifts to each other. This year, Nate made these shadow boxes for me:


He is going to make one or two more to go with them. They are really nice. I love how this second one has a separate "compartment" for my willow tree figure.

Tuesday, April 28, 2009

Wood Shelf

We got a video monitor for McKenna (one of my absolute favorite baby items by the way!). We didn't know where to put the monitor in her room. This spot was the best to be able to see the whole crib...but there was nothing there.

So Nate made a shelf. Not only that, it is a flower. He did a really nice job and put more effort into it than he needed to, but that is Nate :)


LinkWithin

Related Posts with Thumbnails